Free speech for elearning?

This is the second in a series on narration in elearning.

I have a confession to make: I’m a pennypincher. Free stuff is the strange attractor that creates chaos in my office.

Free is not always better. When it comes to computer-generated narration in elearning, free options are not as robust as paid tools or human voice artists, and I rarely use them for finished modules. However, computer-generated narration is a great tool within the elearning development process, and both the Mac™ and Windows™ platforms offer options that work just fine.

0Insert-audio-from-file
Inserting an audio file into Storyline 2

The basic goal is to create an .mp3 or .wav file that you can import into your elearning development project. I use Storyline 2™ by Articulate, which has a simple command for importing files.  So let’s see how to create the files on the Mac and in Windows. We’ll use this sample text:

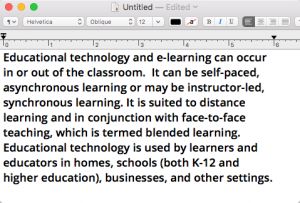
Educational technology and e-learning can occur in or out of the classroom. It can be self-paced, asynchronous learning or may be instructor-led, synchronous learning. It is suited to distance learning and in conjunction with face-to-face teaching, which is termed blended learning. Educational technology is used by learners and educators in homes, schools (both K-12 and higher education), businesses, and other settings.

Mac OS X 10.x (El Capitan)

The first question is probably “Why a Mac, when Storyline 2 operates only in Windows?”

The short answer is that I have a Mac. I have used both Macs and PCs forever, and when it came time to buy my own machine, the Mac just suits my needs and my style better than Windows.

Of course, this presents a challenge with Windows-only products such as Storyline. I meet the challenge by creating a virtual environment on my Mac that allows me to run Windows in a separate window. I’ve tried Boot Camp™, Parallels™, and VirtualBox ™ and currently am happily using Oracle’s VirtualBox to host Windows on my Mac. I can design, create content and graphics on the Mac, and with a few idiosyncrasies, transfer across the two platforms almost seamlessly. VirtualBox is well-supported, and it’s free.

Here’s the three-step process for creating an audio narration file on the Mac. All the applications mentioned are included with the OS X operating system.

  1. Start TextEdit and open the file with the script you want to convert to an audio file. 
    001 original text
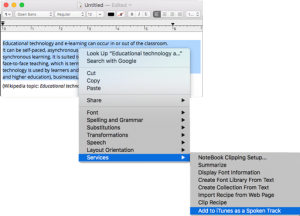
  2. Select the block of text, then right click and choose Services>Add to iTunes as spoken Track.
    02a-set-up-audio-conversion
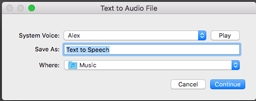
  3. When prompted, select a voice for your file, name and locate the file, then click Save. The file will be saved as mp4a file in the Music folder of your iTunes Music folder. (By default, the file goes to: my name>Music>iTunes>iTunes Music >Music>Unknown Artist >Unknown Album> filename.mp4a)
    03-Save-the-file

From this point there are a couple of things you should do with the file:

  • Listen to it by double-clicking the file. This will open iTunes and play your file.
  • Place the file into your Storyline content folder where it will be available to insert into your project.

Windows 7

And now for the process for creating an audio narration file in Windows 7.

Windows has a built-in TTS feature called Narrator that will read the screen for you, but will not save to an audio file. There’s also the Sound Recorder application, which will record audio and output it to a file. However, I find coordinating these applications to create a narration file is at best awkward. Fortunately there are better options.

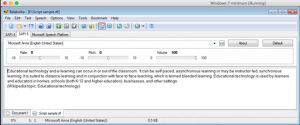
One of several free or low-cost applications in this space is Balabolka™. According to the web site, the name means “chatterer” in Russian. This freeware package is easy to download, easy to install, and works smoothly. I used the default settings and achieved good results.

  1. Open Balabolka. You can either paste your script into the window, or open your text file with File>Open.
  2. Select the SAPI5 (Speech API 5) tab to use Microsoft’s built-in speech recognition and synthesis platform. This may be the default tab.
    1a-text-in-Blalbolka
  3. Select your text, then click File>Save AudioFile.
    2a-save-file
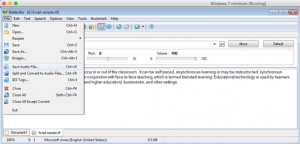
  4. The Save As window will open. Name your file, choose a file format, and save the file.
    00W3-Save-file

And now you have the file which you can preview in Windows Media Player or import into Storyline.

If you are so inclined, you can tweak the setups in both systems to change the speed, pitch, voice, or output location of your file. You can also use programs like Audacity™ to edit the file or export it to another format.

None of these techniques will result in high-quality narration, but they do create acceptable draft narration for development work. And they’re free.


Talking about narration

This is the first of a series of posts on computer-generated narration in elearning.

Back at the turn of the century when I was getting started with online training, there was a debate among designers about whether courseware should be seen and not heard. At the time, broadband was not widely available, so the burden of the extra soundtrack on transmission speeds was something to consider. For my client who was sending courses to affiliate stores in twenty states across a 9600 baud dial-up modem, the answer was easy: no audio.people-1099804_1280

Today the bandwidth issues are largely gone, and the discussion is more likely to be when to use narration than if. Based on my experience, there are times for narration and times for silence.

Do use narration when:

  • You have a very short, highly technical lesson for a technical audience. Show the graphic on the screen, and explain the fine points of what they are seeing.
  • You have a highly graphical subject and narration adds to the graphics. An example of this might be a module on filling out a complex form: show the form on the screen and use the narration to explain how to fill it out.
  • You have a moderately complex subject and narration expands on the key points shown on the screen. This could be considered the “SME with PowerPoint™” model – the screen shows the bones of the subject, but it’s the experienced speaker that puts meat on the bones.
  • Your course design allows learners to easily stop and replay audio. This prevents one of my personal pet peeves about online learning, which I call the “YouTube™ effect”: there’s a video teaching a skill you want to learn, but the speaker talks so fast that you have to stop and rewind every few seconds to keep up.  Your course should allow the learner to pause, reflect on the content, and replay the audio as needed to clarify a point.

Do not use narration when:

  • Physical delivery will be an issue. There are still places where bandwidth is not sufficient to support rich media (this goes for video as well as audio).
  • Narration reads the content on the screen. Learners never read and hear content at exactly the same speed, and having the same information coming at two different speeds will cause confusion and reduce learning effectiveness.
  • The client doesn’t want you to include narration. Clients may have any number of reasons for not wanting audio in their elearning, and you have to respect that.

There are a lot of discussion points around narration, but for now let’s just say that there are times you should use it, and times you should not, depending on the content, the audience, and the purpose of the course. But that brings us to the next question: what type of narration? Do you need an expensive voice-over artist to be able to include good narration in your course?

In the last few years, a large number of text-to-speech (TTS) products have appeared that let the computer read a script aloud. These are not new – the Talking Moose™ appeared on the 1986 Macintosh™. But more recent versions do two things the Moose could never do: first, they can capture their narration in a file that can be inserted into an elearning module in products like Storyline™ or Lectora™, and second, they sound roughly like live human beings.

There are dozens of products that include TTS features, and in another post, I’ll review a few of the major ones. TTS is part of both the Mac and Windows operating systems, which would seem to eliminate the need for external applications. However, the built-in applications are limited in the voices you can use. External products such as those by Nuance™, Natural Reader™ and iSpeech™, have a wider range of more naturalistic voices (iPhone’s Siri for example, is in part powered by Nuance technology). Some of them allow you to tweak the output so that it sounds more natural. (By the way, I am not endorsing any of these products, just saying that they exist.)

At the end of the day, none of them are (yet) as good as a human voice. But TTS has a definite place in the online designer’s toolbox. Here are four good uses for low-cost computer voices:

  • Proofing your narration script. No matter how many times you review a script before sending it to the voice-over artist, you will miss something. For me, it’s usually punctuation or pronunciation of an acronym. Listening to a computer generated draft of your script lets you find those places and correct them, saving you time and rework.
  • Timing your narration to the activities on the screen. Animations and page builds of all sorts are more effective when timed to the narration.
  • Reviewing draft courses. When you are building on a budget, this lets you and your clients review the courses before sending the scripts to the voice-over artist. While the effect won’t be as smooth as a human voice, you can get a draft out for review and feedback quickly.
  • Converting screen content into narration for specialized purposes. The most common use for TTS allows sight-impaired or dyslexic learners to “hear” the text on the screen. While technically not the same as voice-over narration, TTS can fill the gap when you provide no other narration.

I want to thank my Storyline user group, who got me to thinking about narration in elearning. Next time, I’ll talk a bit about how to get computer-generated narration for free.