This is the second in a series on narration in elearning.
I have a confession to make: I’m a pennypincher. Free stuff is the strange attractor that creates chaos in my office.
Free is not always better. When it comes to computer-generated narration in elearning, free options are not as robust as paid tools or human voice artists, and I rarely use them for finished modules. However, computer-generated narration is a great tool within the elearning development process, and both the Mac™ and Windows™ platforms offer options that work just fine.

The basic goal is to create an .mp3 or .wav file that you can import into your elearning development project. I use Storyline 2™ by Articulate, which has a simple command for importing files. So let’s see how to create the files on the Mac and in Windows. We’ll use this sample text:
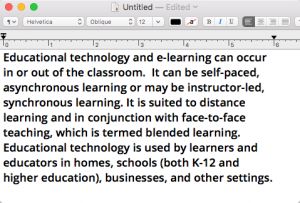
Educational technology and e-learning can occur in or out of the classroom. It can be self-paced, asynchronous learning or may be instructor-led, synchronous learning. It is suited to distance learning and in conjunction with face-to-face teaching, which is termed blended learning. Educational technology is used by learners and educators in homes, schools (both K-12 and higher education), businesses, and other settings.
Mac OS X 10.x (El Capitan)
The first question is probably “Why a Mac, when Storyline 2 operates only in Windows?”
The short answer is that I have a Mac. I have used both Macs and PCs forever, and when it came time to buy my own machine, the Mac just suits my needs and my style better than Windows.
Of course, this presents a challenge with Windows-only products such as Storyline. I meet the challenge by creating a virtual environment on my Mac that allows me to run Windows in a separate window. I’ve tried Boot Camp™, Parallels™, and VirtualBox ™ and currently am happily using Oracle’s VirtualBox to host Windows on my Mac. I can design, create content and graphics on the Mac, and with a few idiosyncrasies, transfer across the two platforms almost seamlessly. VirtualBox is well-supported, and it’s free.
Here’s the three-step process for creating an audio narration file on the Mac. All the applications mentioned are included with the OS X operating system.
- Start TextEdit and open the file with the script you want to convert to an audio file.
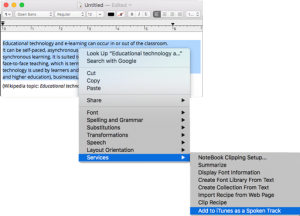
- Select the block of text, then right click and choose Services>Add to iTunes as spoken Track.
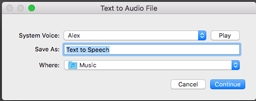
- When prompted, select a voice for your file, name and locate the file, then click Save. The file will be saved as mp4a file in the Music folder of your iTunes Music folder. (By default, the file goes to: my name>Music>iTunes>iTunes Music >Music>Unknown Artist >Unknown Album> filename.mp4a)
From this point there are a couple of things you should do with the file:
- Listen to it by double-clicking the file. This will open iTunes and play your file.
- Place the file into your Storyline content folder where it will be available to insert into your project.
Windows 7
And now for the process for creating an audio narration file in Windows 7.
Windows has a built-in TTS feature called Narrator that will read the screen for you, but will not save to an audio file. There’s also the Sound Recorder application, which will record audio and output it to a file. However, I find coordinating these applications to create a narration file is at best awkward. Fortunately there are better options.
One of several free or low-cost applications in this space is Balabolka™. According to the web site, the name means “chatterer” in Russian. This freeware package is easy to download, easy to install, and works smoothly. I used the default settings and achieved good results.
- Open Balabolka. You can either paste your script into the window, or open your text file with File>Open.
- Select the SAPI5 (Speech API 5) tab to use Microsoft’s built-in speech recognition and synthesis platform. This may be the default tab.
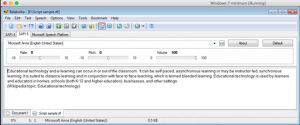
- Select your text, then click File>Save AudioFile.
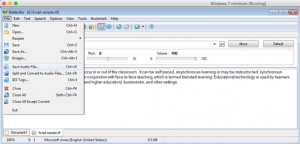
- The Save As window will open. Name your file, choose a file format, and save the file.
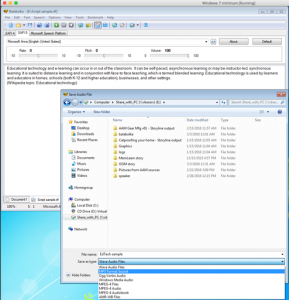
And now you have the file which you can preview in Windows Media Player or import into Storyline.
If you are so inclined, you can tweak the setups in both systems to change the speed, pitch, voice, or output location of your file. You can also use programs like Audacity™ to edit the file or export it to another format.
None of these techniques will result in high-quality narration, but they do create acceptable draft narration for development work. And they’re free.